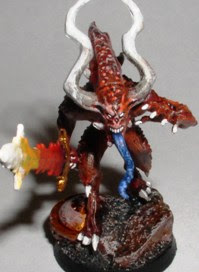
 When I first started painting bloodletters in the 1980's, they were bright red and frankly not very well done. My painting style has improved since I was a young lad (I hope!), and I'm getting much better outcomes for my miniatures, including bloodletters. Today, I want to present to you my painting scheme for the modern bloodletter, as pictured.
 The model is a standard plastic one from the new daemons range. As I've already discussed, I'm very fond of the look of these daemons - they're very true to the original realms of chaos depiction. The only thing that bothers me is that the front of the head doesn't meet up with the rear of the head too well. Had I had more time, I might have used some green stuff to smooth over the crack. The more observant amongst you might also notice that the base is a back-2-basix resin base to which the bloodletter is pinned.
The picture below shows the stages that I go through to get the my plastic bloodletters painted up. This is not the only way to paint bloodletters, but just my preferred style. Codex: Daemons and recent white dwarf articles give more examples of how to accomplish a good finish.
Painting.
Step 1: Black undercoat. Straight forward and let to dry before proceeding.
Step 2: Basecoat of mechrite red. This is applied sloppily to all the fleshy parts of the model, and a small amount on the horns. The sword, tongue (etc.) are left black for the moment. An uneven coating is not such a bad thing - it gives the miniature a unique look and any imperfections that you're unhappy with can be touched up later and even corrected entirely by steps 3 and 4.
Step 3: Inking. I use a blend of 1 part black to 3 parts red. The inking gives a depth to the flesh that is important to a good finish.
Step 4: Blazing orange drybrush. The blazing orange is blended up from the red to increase the brightness of the model and contrast the depth of the inking layer.
 Step 5: Using almost pure blazing orange, I carefully pick out the bumps on the flesh along the back, shoulders, chest and hips of the model. On other bloodletters, I've experimented with dheneb stone and bleached bone for these bumps. I think blazing orange, or orange mixed with bleached bone is just about right for these bumps.
 Step 6: Some more detail here - I lighten the flesh a little more and pick out ridged parts and highlights using a mixtured of blazing orange and dheneb stone. The horns and nails are also coated in near-pure dheneb stone near the tips and drybrushed to blend in with the red of the main head.
Step 7: Ah, the hellblade! In Codex: Daemons, they're portrayed in a number of ways, but where they are painted as a blend of colours, the cooler colours are toward the tip. I personally don't like this - I think the hotter colours should be nearer to the tip: why would a hellblade be heated near the middle?! Anyhow, I rather enjoy painting these hellblades. I start with blood red and red gore near the hilt and apply a liberal blob to either side of the blade. Before it dries, I apply another good blob of blazing orange and blend it together with the reds. Then, sunburst yellow. Finally skull white at the tip. Just remember to do it relatively quickly (especially if the temperatures are >30 deg C as they are in Australia where I am).
Step 8: Finishing off. I've painted the tongue in a couple of shades of blue. It makes the miniature look unusual and I like it. I think technically it should be black to be in keeping with the old Realms of Chaos books. One other thing to keep in mind is that by painting the tongues in different colours it becomes obvious which miniatures belong to you if you're up against other daemons (cf. squad markings of space marines). The eyes, teeth, toenails and fingernails are highlighted in white, along with the very tips of the horns. I've also taken care of the base at this stage as well.
Evaluation:
The bloodletters positively bellow Khorne to the observer with their red flesh and striking molten-looking hellblades. The only thing I might change is the way in which I approach the horns. Otherwise, I'm broadly happy with the end result.


4 comments:
Nice job, I've always struggled with painting things like power weapons and such and getting them to look "right."
Thanks a lot for this I am currently painting a power weapon that was made mout of lava so this could be useful.
Thanks guys - hope the hellblades have inspired you!
your blog is a lot of help, thanks
Post a Comment