
Beasts of Nurgle are non-trivial to assemble. This posting is intended to be a guide to constructing them and I hope that it helps some other people out there who have looked at the parts and wondered how they all fit together. The idea for this post originally came about as I was being asked this very question by a couple of other players.
Starting Off.
In total, there are seven (Nurgle's magic number!) different metal parts to contend with. There are also no instructions about how they fit together provided - I guess one is supposed to look carefully at the images in codex: daemons and see how it all might work. The real problem is seeing which one goes where and how they inter-connect.
In the picture below, I've laid out the seven parts. I'm going to piece the beast together using glue and milliput (a type of greenstuff that I favour using). I've already trimmed the pieces and removed the excess metal flashes - this is necessary before you start to put the beast together, otherwise the parts won't fit snugly.
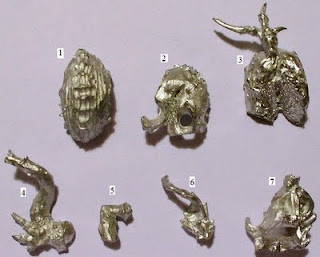 The parts (as labelled) are:
1: The back
2: Lower body, Left
3: Lower body, Right
4: Tail
5: Leg elbow
6: Tongue
7: Main part of the head
Lower Body.
After sorting out these seven bits, the first thing to do is to assemble the lower body. This is done by joining parts 2 and 3 together. Below, I've pictured the lower body being assembled on a standard warhammer 40,000 40mm circular base to give an indication of the scale. I've also left the other bits in place so that it is obvious which pieces I've used. Gluing the bits to the circular base may also be a good idea at this stage. The Tail.
The tail (part 4) is a large piece that fits on to the rear of the body and snakes around to the front. It also contains the claws of the beast's left foot.
 Leg Elbow.
The next part to work with is part 5 -- the elbow, or knee of the leg. It attaches on to the side of the beast's lower body (part 2) and connects up with the tail (part 4). I found a liberal blob of greenstuff really helped at this stage to smooth over the connections!
 The Back.
One of the trickier bits comes next: the back (part 1 as labelled above). The first step here is to figure out which way around the back is supposed to connect up to the main (lower) body with. This can be done by inspecting the socket of the lower body and dry-fitting the back to ensure you've got it correct. The back must be strongly glued and greenstuff-ed in to place at this stage.
In the picture below, I've now rotated the view of the camera, but you can still see parts 6 and 7 waiting for their turn in the background. I'd strongly suggest waiting until the back has firmly set in place before attaching the other two parts to the rest of the body.
 The Head.
Whilst you're waiting for the back to dry off and become a solid addition to the rest of the body, you can work on the head. Although it may not look like it at first glace, the tangles of tentacles that make up parts 6 and 7 join together to form the head of the beast. They connect up in a relatively simple manner: just ensure that the tongue sticks outward and it should be easy from therein. As a hint: look for the teeth (above the tongue) to guide you as to which way around things are meant to be. The eyes of the beast are very recessed areas just above the teeth. Finishing off!
The final step is to attach the head (now in one piece) to the rest of the body. Don't attempt to do this until both halves of the miniature that you've assembled in the previous steps are solid (i.e. the glue and greenstuff are dried off). And there you have it: a completely assembled beast of Nurgle! Painting still required...
Starting Off.
In total, there are seven (Nurgle's magic number!) different metal parts to contend with. There are also no instructions about how they fit together provided - I guess one is supposed to look carefully at the images in codex: daemons and see how it all might work. The real problem is seeing which one goes where and how they inter-connect.
In the picture below, I've laid out the seven parts. I'm going to piece the beast together using glue and milliput (a type of greenstuff that I favour using). I've already trimmed the pieces and removed the excess metal flashes - this is necessary before you start to put the beast together, otherwise the parts won't fit snugly.
 The parts (as labelled) are:
1: The back
2: Lower body, Left
3: Lower body, Right
4: Tail
5: Leg elbow
6: Tongue
7: Main part of the head
Lower Body.
After sorting out these seven bits, the first thing to do is to assemble the lower body. This is done by joining parts 2 and 3 together. Below, I've pictured the lower body being assembled on a standard warhammer 40,000 40mm circular base to give an indication of the scale. I've also left the other bits in place so that it is obvious which pieces I've used. Gluing the bits to the circular base may also be a good idea at this stage.
 The Tail.
The tail (part 4) is a large piece that fits on to the rear of the body and snakes around to the front. It also contains the claws of the beast's left foot.
 Leg Elbow.
The next part to work with is part 5 -- the elbow, or knee of the leg. It attaches on to the side of the beast's lower body (part 2) and connects up with the tail (part 4). I found a liberal blob of greenstuff really helped at this stage to smooth over the connections!
 The Back.
One of the trickier bits comes next: the back (part 1 as labelled above). The first step here is to figure out which way around the back is supposed to connect up to the main (lower) body with. This can be done by inspecting the socket of the lower body and dry-fitting the back to ensure you've got it correct. The back must be strongly glued and greenstuff-ed in to place at this stage.
In the picture below, I've now rotated the view of the camera, but you can still see parts 6 and 7 waiting for their turn in the background. I'd strongly suggest waiting until the back has firmly set in place before attaching the other two parts to the rest of the body.
 The Head.
Whilst you're waiting for the back to dry off and become a solid addition to the rest of the body, you can work on the head. Although it may not look like it at first glace, the tangles of tentacles that make up parts 6 and 7 join together to form the head of the beast. They connect up in a relatively simple manner: just ensure that the tongue sticks outward and it should be easy from therein. As a hint: look for the teeth (above the tongue) to guide you as to which way around things are meant to be. The eyes of the beast are very recessed areas just above the teeth.
 Finishing off!
The final step is to attach the head (now in one piece) to the rest of the body. Don't attempt to do this until both halves of the miniature that you've assembled in the previous steps are solid (i.e. the glue and greenstuff are dried off).
 And there you have it: a completely assembled beast of Nurgle! Painting still required...
7 comments:
Ah! Where were you two months ago??? This is a fantastic tutorial. I definitely would have used it to reduce the stress involved with assembling this model.
When I was putting my Beast of Nurgle together, using liberal amounts of greenstuff was key. The metal pieces did not fit together smoothly at all, and there were large gaps at pretty much every join. For those of us with little (or no) greenstuff skill, this can seem daunting. Just remember that the beast belongs to Nurgle, and Nurgle doesn't demand clean lines and perfect seams. Bumpy and distended is fine!
Again, great tutorial.
Awesome tutorial!! Man keep posting stuff like this woot!!
Wow.
I had figured the thing might be a beast to assemble, but that takes the cake.
I've no doubt it'll help folks out to see this. However, I think if I were to roll with 'em I'd probably take the easy way out and make 'em out of Chaos Spawn.
Hi Guys:
Thanks for the positive feedback :-)
Shrink to Fit: yes -- gribbly and uneven use of greenstuff is perfect for Nurgle!
Cheers!
Assembling mine (a few months ago) took forever. Mainly because the pieces didn't fit together so easily as you and StF have mentioned. I ended up continually second-guessing how pieces arranged with each other.
Great tutorial
it looks like you used a 40 mm base, when if you look at the codex, it shows it has a 60 mm base ?
Hi Eric,
You're right -- the codex does show a 60mm base in the Beast of Nurgle images. However, the metal blister pack I bought was supplied with a 40mm base. Hence I've assembled it "as sold".
I had a look at the Games Workshop website -- it also displays a 60mm base. But the description text explicitly specifies that it comes with a 40mm base.
Cheers & Well spotted!
Post a Comment