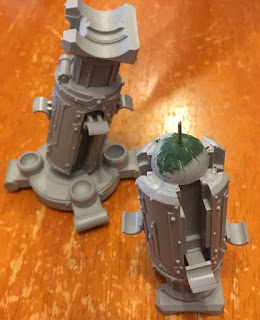
Feeling a bit like a dentist must, I decided that the best way to solve the resin cavity (forgive the term - it is accurate) in the leg of my Reaver was to undertake a filling.
To do this, I made sure that I firstly had drilled a deep enough hole in the cavity to host a brass rod firmly in position. After gluing the brass rod in to the cavity, I proceeded to fill around it with green stuff mixed with a touch of grittier milliput. With that dry, I went over the top of the hemisphere of where the cavity has been and covered it over with liquid green stuff to make the hemisphere whole again.
The job complete, its now time to let it dry before welding it in to place on the other leg. In the image, the first leg can be seen in the background. I have adopted a striding stance for this titan as I wanted it do be dynamic. Having fitted the plates, I'm happy that this stance will work nicely despite the obvious angle. Still plenty of work to go in this titan yet...


1 comment:
That looks like a sturdy fix, if you are going for a mega dynamic pose, I really recommend affixing to a MDF base to provide the third side of a 'triangle' shape to prevent the legs from splaying and tightening everything up and strengthening the build. My Warlord Legs are as sturdy as can be, no movement whatsoever so I am confident in adding the extreme top weight of the Torso, Arms and carapace. A base also provides a wider footprint for stability.
Post a Comment